Kitchen Island & Lights

When you last saw our kitchen, we had just finished putting in the wood floors. What an amazing difference that made! Now I’m back with an update on how it’s looking today… ta da!

We’ve since added the big eat-in island, yellow stools and swapped out the lighting! First up was the island. We bought stair posts that we cut to size to use as the legs (and when I refer to we, I mean my dad). Then my dad made a frame to support the countertop. And while we’re waiting for our countertops, he added a plywood top so we could still utilize the island. And man is it sturdy! Plus, check out the stools I spray painted yellow during the summer. They started off as those school lab stools.

The next weekend, my dad took down the one (way ugly) ceiling light and then the fan with a light. Instead we replaced them with pendants over the island and two pot/can lights. It’s amazing how different lighting really changes a space. It’s a million times brighter and just all around better atmosphere thanks to the pendants.

And yes to a few questions I’m sure some of you have… yes we have patch the ceiling still and repaint it (boo) and yes there are christmas lights still drawn on our chalkboard. I need to grow taller to reach that to erase it.

So next up is painting the legs and island (which I’ve currently primed and painted one coat so far, hopefully I’ll finish that this week). Then we need to order our countertops this week, along with a new sink and faucet. Then the exciting backsplash and eventually painting the ceiling. So close! And to remind you where we started, here is the before…

Life Indoors

Well… it’s officially freezing out. As pretty as fall is with the changing leaves and all, the cold temps really bring me down. I live for summer! I love the warmth, the growth, the sunshine, the long days and the beach. I especially am a fan of the fact that things outside are growing and full of life: the trees, flowers, grass, bushes and wildlife. In fall and winter, I can’t help but feel a little depressed looking out my window and seeing everything dying and/or dead.

To keep my spirits up, I’ve been trying to introduce some greenery inside: plants, trees, grass whatever. For awhile, I actually had live plants in our house. A couple succulents from Ikea, an indoor fern and an elephant ear from work. However, as much as I love the live plants, my lack of remembering to take care of them (ahem, watering them) took it’s toll and I now have a couple of brown dead plants in my house right now. It’s basically fall inside too, lovely.

Since it seems that our lives only tend to get busier and busier, I’m committing to sticking to the faux route from now on. Seriously… how easy is it to buy a fake plant, put it in a pot or vase and call it done. Easier than making yourself a bowl of cereal, and that is easy my friends.

I recently did a photoshoot for some fake terrariums for work and styled them in our home. After seeing the photos, I thought, wow I better get some of my own. I already have a few fake plants from ikea that I love, but I’m thinking I should get some more (just none of that fake ivy stuff you see in your grandma’s house). For the photoshoot, I loved adding them to my bookshelves or using as centerpieces.

PS don’t these look really real too?!

Fall Family Day 2013

Each fall, Drew and I made it a tradition to do a “fall date day” – while we haven’t quite found the time yet to do our own, since my sister, brother-in-law and niece were in town, we wanted to take Reese to the pumpkin farm to experience fall traditions.

We went to Elegant Farmer (East Troy, WI) where they have pick your own apples, pumpkins, a corn maze and hayride – the perfect fall trifecta + 1 (not sure what you call an awesome group of four?). It was a bit chilly, but she didn’t mind and had a great time! We were just missing Drew, Ben, and Jess.

Since I’m the person that takes all the photos in our family, my dad was kind to be the purse holder for me.

This is the only part I like about fall – now that we took some photos with some pumpkins, we can skip ahead to spring if you asked me.

The Making of our Gallery Wall

Back in February we took a trip to Ikea when visiting my sister and brother in law who had just moved to IL. We purchased a bunch of frames to create a gallery wall in our living room that would hopefully fill a GIANT wall and not make it look so bare.

We hung the frames just in time for our life group, but lived with the fake ikea filler photos for about 6 months until we finally hung some art. Now I’m finally here to share the inspiration and the behind the scenes of making this gallery wall.

Let’s start with the largest piece. We took one of our engagement photos (shot by Valo Photography) and I added the text “Where there is Love, there is Life” on top of it.” I had Walmart print it in one of their poster sizes.
 Let’s move to the left – the piece of the yellow water style feather. During my search for ideas for art prints, I found a few freebies on the web. This was one I found but I edited it a bit to fit the color scheme I had going. You can download it here from the Oh So Lovely blog.

Below that is a three-photo frame. I wanted something that we could change out periodically – so the first photo will remain our wedding day (kind of like the start of our lives together) and then the last photo will change as we grow our family. Right now it’s a photo of us with our house, since that’s the stage where we are at right now. In the center is a print I made. I used the 53 paper app and drew the leafy thing and then added the “W” and “The Wylers est. 2010” in photoshop and had it printed at Walmart.
Now onto the right side of the wall, starting at the top is a piece I made out of paint color swatches. I have about a million of them from when we were selecting paint colors, so I just hand cut them out on a 12×12 sheet of paper and mounted them with some mounting strips. Here is where I got the inspiration to do that.

Then lastly, right below that piece is another piece I made. I love the look of forsythias. I had submitted something similar for minted.com but wasn’t selected (unfortunately), however when I was dreaming up this gallery wall I knew that piece would look great, but I knew I needed a bit more color to balance things out. I reversed the colors a bit and got this art print. Again I printed it as a large print at Walmart. Because I’m so nice, I actually have that art print for sale on Society6 currently, along with a forsythia pillow design. So if you’d also like a print like that for your home, please check it out!

I also took a few more of my “minted rejects” and added them for sale on Society6. Please check them out and feel free to “like them” 🙂


Our Home: One Year Later

Exactly one year ago today, we were signing a million papers at our house closing and were handed a set of keys – we were officially homeowners! After our closing, Drew had to head back to work, but I took off to our brand new home and tested out the 101 paint samples on each and every wall. After finalizing colors, we painted almost every room and moved in that weekend.

365 days later and we’re still in love with our house, though it is looking much different from the day we moved in, and in a very good way! I’d say just about ever weekend has been an episode of weekend warriors, where we’ve tackled some little projects such as painting a wall, swapping out the yellowed outlet plates, along with larger projects such as demoing the floor, cutting down a tree, and painting all the kitchen cabinets. Words don’t really do justice, so here are a few shots of our house before (the realtors photos) and how our house currently looks, one year later. I’ll also share what we’ve done, and what we are hoping to do in the future.

Disclaimer: Our house doesn’t look this clean all the time, if only you could see what was shoved behind me for each shot so that it appeared all styled and clean.

Foyer & Living Room / aka Vanessa’s Chill Spot

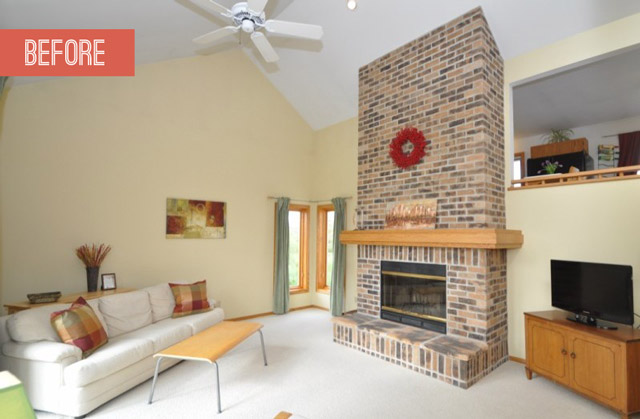
We painted the walls gray, added subtle stripes, got a large couch, made curtains, got a huge rug, hung a small gallery wall, added privacy to our front door, and accessorized! What we still need to do is: figure out something to do with the fireplace, paint trim and doors white, and swap out the fan for a light I purchased. For the foyer, we will need to tear out the existing tile and re-tile with our faux wood tile I won.

Kitchen

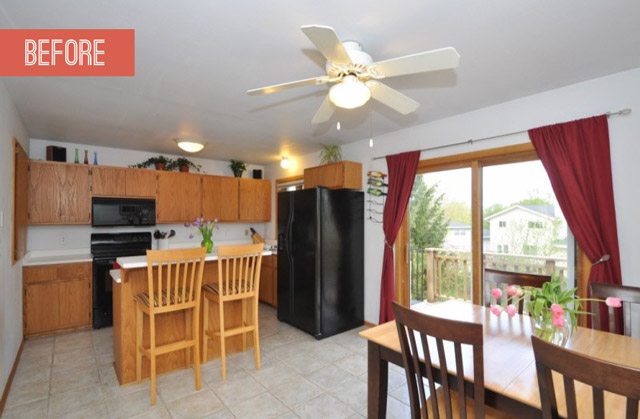
We painted (twice) a blue/green/gray color, painted the cabinets, added hardware, painted a chalkboard wall, tore up the tile and replaced with hardwood, painted the trim and swapped out the light above the sink. What we still need to do: install a larger island, new countertops, new sink and faucet, new lighting above new island, ditch the fan, add a comfy chair in the corner by the patio door and maybe a rug.

Master Bedroom

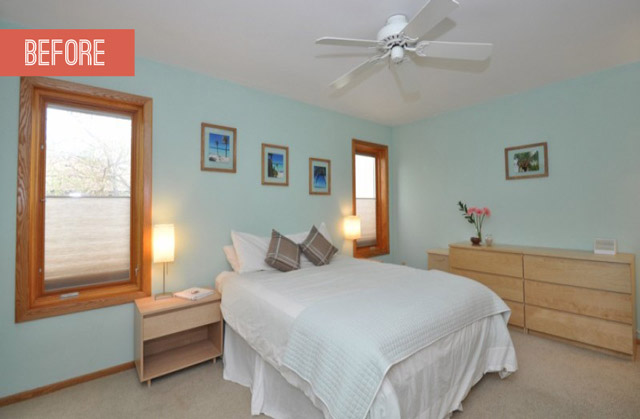
We painted the walls a green color, hung curtains, added shelves, replaced the fan with a new light. What we still need to do: paint the trim and doors white and keep up on laundry so it isn’t such a disaster 24/7.

Upstairs Bathroom

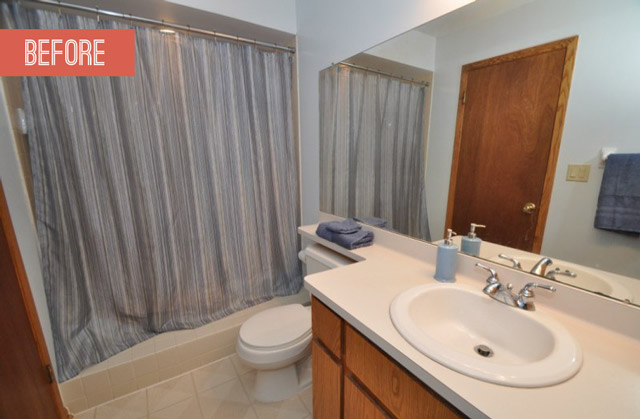
We painted the walls gray, hung a new shower curtain, and re-grouted the shower. What we still have to do: tile floor with penny tile, re-tile shower with white subway tile, swap out countertop to ditch shelf over toilet, paint walls same color as the kitchen, hang shelves above toilet, paint trim and door white, swap out large mirror for smaller and framed one and paint the vanity – oh boy.

Spare Bedroom 2

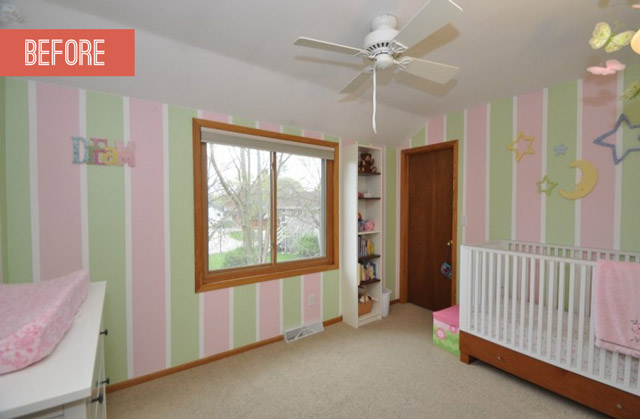
We re-mudded walls to remove the striped texture, painted the walls a dark gray/navy, painted trim white, hung curtains, hung cork board circles, and painted desk and dresser yellow. What’s left to do: this will eventually become a nursery when the time comes, but for now it’s our office/dump everything room that is being used for our overflow while we work on projects in the kitchen and bathroom.

Family Room / aka Drew’s chill spot

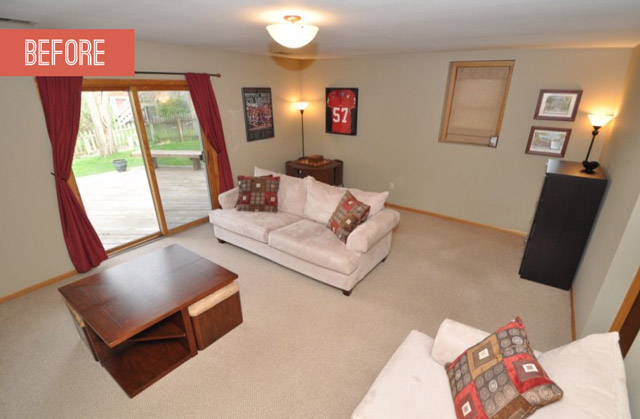
We painted the walls a teal color, my dad added the board + batten, swapped out the media center for a mid century modern dresser, hung curtains, and hung a few things on the wall. What we still want to do: lots… ditch those two tall bookshelves by the media center, get two new couches similar size to the “before” photo, hang more things on the wall, get a colorful rug to ground the room, and finish painting the trim and doors white.

Downstairs Bathroom

We re-texturized the walls, painted them green, painted the trim white, sealed the granite countertops, cleaned and re-sealed grout, and added shelves above the toilet. What’s left to do: swap out the outlet covers to white, paint the door white, and add hardware to vanity drawers because they are impossible to open.

Spare Bedroom 3

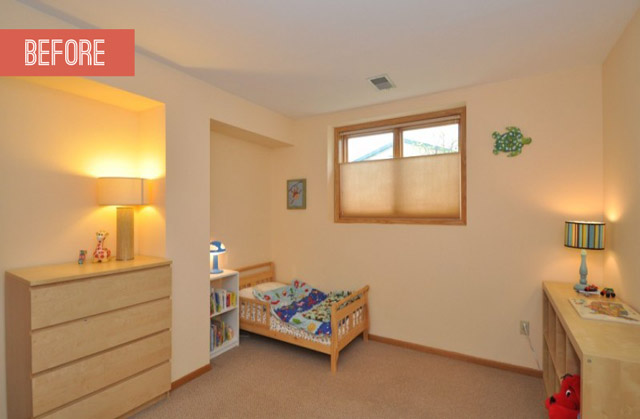
We painted the walls gray and some of the trim white – and turned this into our guest room – we purchased a mattress, bedding and all the fun colorful accessories! What we still need to do: swap out the electrical outlets and finish painting the trim and doors white.

Laundry Room / aka Eddy’s room

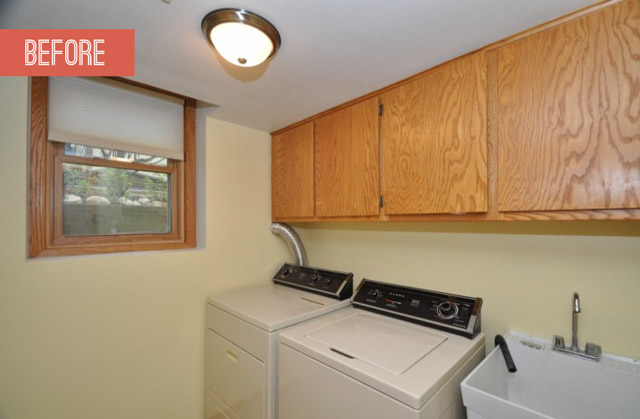
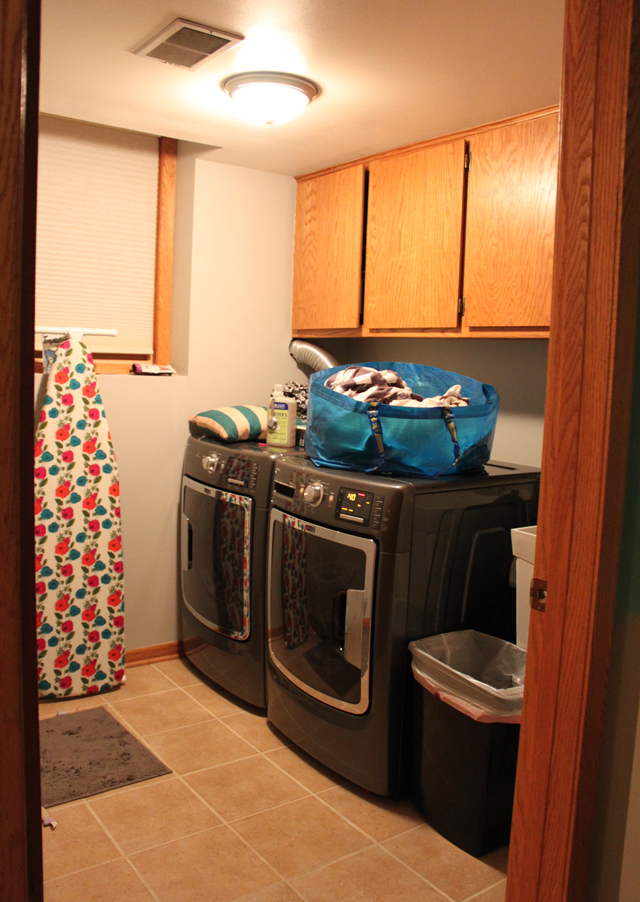
Ha, this is the least important room to me, so it’s been pretty neglected. The only thing we’ve done is added the new washer + dryer and painted the door frame white. What’s left to do: paint the rest of the trim and door white, paint the cabinets white or figure out a better solution for them and install a countertop over the washer and dryer.

Outside

What we did: Planted a bunch of bulbs (here and here) and a few perennials, added mulch, removed weeds, trimmed trees, racked leaves, re-seeded some spots, power washed and re-sealed/stained the deck and added some fun backyard curtains and furniture.

This past year you can visually see the changes within our house, but a quote I was reminded of yesterday from Young House Love’s Oprah special, spells out what our home really means to us. This past year, our home is where we have made plans and dreamed big dreams of the future, made new memories and filled it with love.

“A house is made of walls and beams, but a home is built with love and dreams”.

A Minted Holiday!

Guys, I’m really excited to share something with you all! This past year I’ve been submitted designs to minted.com challenges. My main goals were to bring in a little extra money for our house reno projects + stretch me as a designer.

For the first part of the year, I was really growing as a designer and trying new things as I entered into the Minted challenges. Then finally I found out I would have four of my designs in their 2013 Holiday Collection! That meant prize money and commission. Cha-ching. Cha-cing.

While having four designs in their program seems amazing now, it was not always easy. To be honest I was really discouraged thru most of the year with my minted entries. I would spend almost every night working on them and see the same few winners win and felt like I’d never win. But I was determined to win and I’m glad I stayed the course. They have a great community forum section and I also recently discovered it took most people a year or so of submitting to finally win.

Now that I’ve won four, I feel much more confident and determined to keep submitting. I’ve really grown as a designer this year and I’m thankful for the opportunity to submit all 61 of those entries even if I didn’t win all of them.

But now seriously, go check out my winnings and share them! PS I’m also open to design custom Christmas cards this winter – so don’t hesitate to contact me with some ideas!

PLAID HOLIDAY 
plaid red gray holiday christmas card

PACK YOUR BAGS
mail vintage holiday christmas card stripesmail vintage holiday christmas card stripes LOOKING BACK TIMELINE
timeline christmas holiday card business cardtimeline christmas holiday card business card COMPANY YEAR IN REVIEW
business holiday christmas card that shows stats and figuresbusiness holiday christmas card that shows stats and figures

Kitchen Progress: Floors, Walls, Light

That past few weekends, we’ve made great progress on our kitchen! Here are a couple things that we’ve knocked off our to-do list (the things in italic are items we just finished):

Kitchen (see inspiration here)

  1. Paint walls a green/blue/gray color
  2. Add MDF board trim to create shaker style cabinets
  3. Paint cabinets white, paint trim white
  4. Add knobs and pulls to cabinets
  5. Create larger island and use as table (like this)
  6. Tear out ceramic tile and replace with dark wood floors
  7. Get new countertops, probably laminate but would love a solid surface
  8. Replace sink & faucet
  9. Get new bar stools and spray paint yellow
  10. Paint a chalkboard wall
  11. Add curtains
  12. Accessorize
  13. Add pendant lights, under cabinet lighting and swap out sink light
  14. Add light grey penny tile as backsplash

So we thought we’d share some updated kitchen photos, and make sure to check out the progress: re-painted the walls, installed the wood floors and swapped out the light above the sink!

Even our cat is loving them!

Benjamin Moore Palladium Blue

The floor we picked is an engineered click-lock hardwood floor, sold at Menards in a Vintage Hickory finish. We love it because we know a few people who have installed it recently and it’s held up great for them so far! The click & lock feature was awesome and made installing them a breeze (we installed 98% of it in one afternoon/evening). Here is a close up of how it looks snapped together where we didn’t install a transition yet because we’ll be laying tile down in the bathroom this winter.

The light above the sink was a clearance find at World Market – I love the detail in the metal shade. It was originally red, but I spray painted it yellow, the same color as I did our stools. PS check out my little photo bomber.

And the new wall color is Benjamin Moore Palladium Blue. We lived with the original blue we had picked out for almost a year, but after awhile we decided we wanted a less bright hue, so we repainted it. It only took me one Saturday morning and a little less than half a gallon of paint, so a small price to pay for a way more loved color. PS our cat just love to get in these photos…

Benjamin Moore Palladium BlueBenjamin Moore Palladium BlueCrazy to think this is how our kitchen looked just under a year ago…

Next up… creating island legs, installing some pendants for over our large island and then countertops!

Trying Out a New House Color

When we bought our house last September, we knew our roof was on it’s last leg. It’s the original roof (23 years) and usually these types of roofs (three tab shingles) only last 20 years. We’ve been fortunate enough to not had any leaks, the only issue we’ve had is a few missing shingles. So besides the fact it brings down the curb appeal a tad, our house was ok.

However, I don’t think we should wait for our roof to leak in order to fix it. We’ve been putting away money for a new roof, knowing it would need to be done soon. So with getting a new roof, the other questions that come are: what type of roof do we want to get and what color roof do we want to get.

We’re going to go with the dimensional/architectural roof shingles, basically what most of the houses have if you’d drive around in any suburban neighborhood.

Then when you ask us the color, well that opens up a whole bunch of what ifs. Our house currently has wood siding. While it’s nicer than the traditional vinyl, wood siding has a few drawbacks. 1. Woodpeckers, trust me, they are not good news for wood siding. Just ask our multiple holes around our house. 2. Maintenance – it needs to be repainted over time. 3. Rot, wood siding can rot unfortunately.

Since we’ll be needing to replace our siding in about a year (probably with vinyl for longevity) we have the options to spice up the color on our house. Our house features brick in the front but the rest of the siding plus the trim is a light beige. Not my first pick for color choice, but it really goes well with the current brick. And while I love painted brick, I feel if we paint over this brick, our house would loose some of it’s appeal and look flat. So if we decide we want to go a different color route, we might also want to adjust the color of the roof too.  Seriously, does it have to be this complicated?!

So to get some ideas, I did a little pinterest browsing (view my exterior home pins) and drove around a few expensive neighborhoods to see if any houses had similar brick and if so, what did they pair with it for the color of the siding, trim and roof. Here are a few pinterest photos I was loving:

So then like any person would do, they’d try to imagine their house with different paint colors. But to get the most realistic effect, I went to photoshop and tried a few quick options (quick is the key word). Here is what I came up with:

What’s your favorite? Surprisingly I’m liking the same siding color, but with the tad bit darker trim option (the last one). Or maybe I’m just nervous because I’m used to what it has been. So seriously, tell me which is your favorite… since it’s not your house and you aren’t used to pulling it up to it everyday.

Also if you didn’t notice, I changed the roof color on a few also, since I thought a more grayish roof with less brown would look better with some colors?

Backyard Before & After

So we started off the summer purchasing some new furniture and hanging curtains. It really spruced it up and made our backyard and deck so much more enjoyable. However, we new the deck needed some TLC. So what started as a weekend of pressure washing, turned into a month+ project of cleaning up the deck and weatherproofing and staining it. Poor Drew – at least it kept him busy while I was painting the cabinets for a year. Here is a quick reminder of where we last left it…

And here is how it’s looking now after using the Behr Weatherproofing stain in the Transparent Chocolate color. PS also notice how different the plants look (good and bad)!

Seriously, check out these coleus plants below, I’ve never had them grow this huge… not sure if it’s because they always died before they got this big or what, but I LOVE them!
Oh and our hydrangea bush is blooming – so much beauty to enjoy! Looking at these photos again is really making me wish summer didn’t have to end. I guess when I’m feeling winter depressed, I’ll fill my mind of these summer memories and count down the days until the snow melts.

Kitchen Cabinet Update

We are SOOO close! Tonight I finished installing the last of hardware (both knobs and pulls are from Target) on our re-finished cabinets and now can enjoy them in their full glory without worrying about dirty hands touching the new doors. Drew also helped drill and hang the rest of the doors tonight.

It’s amazing that these once were flat, wood honey colored cabinets.

The only thing left to do (for the cabinets) is adding the wood trim onto this fake drawer in front of the sink, which means my dad has to come over and help, and then prime + paint it.

Woot – next up: installing wood floors and then new countertops!