Living Room Progress

Yesterday we had company over for my mom’s birthday (happy birthday mom!), so I did my best to get a lot of the living room situated before then. I also had my camera out to take some photos for work, so figured it would be a good time to give an update on the progress so far.

I already shared that we got a new couch, but I’ve also added a bit of accessories throughout the room, as well as made some decisions on a rug, curtains, and lighting to tie in the space more. We also have to paint the walls and that would make a huge impact.

Here is the before photo:

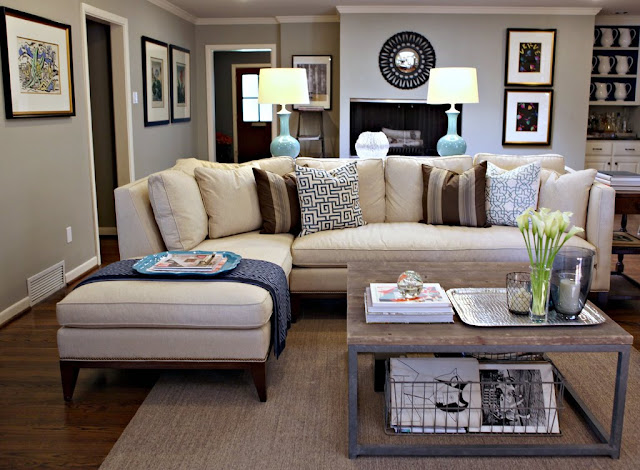
Here is how it’s looking now with the new couch, pillows, coffee table, and tv/media center. Please look past some of the clutter and the Christmas stuff for the work photos!

Here is what we’re doing for the rest of the room…Adding this huge 8×11 golden geometric rug, hanging these vintage-y dwell studio curtains and replacing the fan with the huge Ikea Maskros PS. We’ll also be painting the walls a medium/light gray but I’m still having a hard time narrowing it down without getting a purple hue to it when the light shines in.

Stay tuned for more progress! I’m so excited for this room, since it’s more my space when Drew has friends over, or the more formal chilling with a bunch of people space.

Dilemmas: Curtains & Rugs

Mission #1:  Find a bright yellow geometric rug for our living room to coordinate with the couch, curtains, and more.

Mission #2: Find bright yellow curtains for our giant windows (2 are 108″ and 2 are 84″).

There are SO many options, so I’m hoping others can help me decide. We have yellow/gold chevron pillows, white pillows, dark grey couch and the walls will be a light to medium grey. I’m also doing some bold grey & white stripes on the far walls. Let me know which are your favorites!

RUGS (from RugsUSA.com all 60% off)
This one above comes in 8’6″X11’6″ and is only $271.60 + Free Shipping

This one above comes in 8’3″x11″ for $231.60 + a Runner size 2’8″x10″ for $71.60 + Free Shipping.

This one above comes in 8’3″x11″ for $247.36 + Free Shipping.

This one above comes in 8’3″x11″ as well and is $255 + Free Shipping.

CURTAINS (from fabric.com)
(image above: etsy)


(image above: etsy)


Dream Couch is Ours!

Awhile back I professed my love for a certain couch – Well yesterday my dreams came true as we hiked down to Ikea (well we drove, not really hiked).

It began like this. I saw this sofa on a blog. Fell in love. Decided any house we bought had to fit this couch. Bought the house. Sat on the floor to watch tv in the meantime (not cool). Taped out the couch on the floor to make sure it would fit. Plan to go to Ikea to pick it up (borrowing a trailer) since the shipping on it would be $300+. Drove 2 hours to Ikea, loaded it up and brought it home.

And this is how it looked packaged up. Scary… but we weren’t too intimidated. I immediately started ripping open the boxes while Drew finished up some work stuff. Once he was done, we were ready to get assembling. Overall it was pretty darn easy – with the help of two people it made it go by faster. I was stuffing pillows and cushions while Drew was doing the nuts and bolts.

Here are a few shots I managed to take with my iphone every time I took a break to enjoy some lemonade…

Verdict. We LOVE it. We have yet to really enjoy it since we finished assembling at 10pm last night and then went to bed – it’s also a dark grey compared to the black color it looks in the photos. (PS don’t mind the awful space between the chaise. We realized we stuffed the cushion in the wrong way and have yet to fix it). This morning Eddy was professing his love for it too, as he was continually doing hurdles over and under the couch. It was a site to see. Oh and don’t you love our cardboard rug? Once we finish the space up a little bit more, I’ll share some non-iphone photos!

Chalkboard Wall

It’s been a long time since I had this photo saved from the blog 4Men1Lady of their chalkboard wall wanting to someday do something like this once we owned a home. So finally the time had come – It was going to be a must in our kitchen as it would work with the color schemes of yellows, white cabinets and light blue/teal walls.

4Men1Lady

I bought 2 quarts of Rustoelum Chalkboard Paint. We did our best to follow the directions. First we needed to sand down the wall to ensure a smoother writing surface – Thanks Drew for doing that! Then my mom applied two coats of the paint – I was busy painting the ceiling in another room at the time.

Once it was dry for 3+ days, you condition the walls as per the instructions. That means you take a piece of chalkboard (I got sidewalk chalk for this) and rub the whole entire wall on the chalk’s side. You then pretend you erase it or smudge it into the wall with a cloth. This prevents “ghosting” and ensures it erases future artwork. It says if you ever wash the wall (with water) that you need to condition it again the same way, but to allow 7 days of drying before conditioning it.

So far the instructions have held up. We’ve drawn and erased easily! Here is the how the process looked… sorry some of these were from my phone and at different times of the day, so the lighting is a bit different.

I’ll be sure to post more of what I write/draw on the wall – I’ve found tons of inspiration from Pinterest, I just have a hard time picking what to do first and next!

Spare Bedroom Set-Back

Last Saturday began like this…

I got up early to run to Home Depot to get paint samples for the spare bedroom upstairs. I slapped them on the wall and then went back to get the decided on paint color. My mom came over and was helping me do the paint (she’s way better than me at cutting in). We thought, man, we could knock this out in a couple hours or less – there is no ceiling to paint or anything. Ha – the universe was laughing at us.

As we began painting, we discovered something bad. As we were cutting in and putting the first coat on, we saw that the previous owner’s striped walls were leaving very visible vertical lines due to the thickness of the paint vs the non-painted areas. We thought maybe one full, thick coat would help. Ha (says the universe), nope. Instead of wasting more and more paint, we tried to come up with possible fixes.

We tried…
– Adding paint to just the non-painted stripe areas. Nope.
– Adding a sand texture to the non-painted stripe areas and blend into wall gradually. Nope.
– Sand down the edge then apply sand texture and then a coat of paint. Nope.

So next up we try my dad’s suggestion which would be trying some dry wall mud and smoothing it out basically all of the entire walls, re-sand it complete and then paint. So much for knocking that one out easily and now that room is in a crazy, messed-up state with all the furniture in the middle and the walls half painted.

Oh and be aware, this color is NOT BLACK. I know it looks like it but trust me in the end it’s going to look amazing. I’ve done some serious research when it comes to how I wanted our home to look. I was a bit scared at first when we started rolling it up there, but after doing a re-assuring Pinterest search for charcoal walls I was relieved again. This is the my color inspiration from this little girls room, and we’re using Dark Pewter by Benjamin Moore (seen in first image), color matched at Home Depot in Behrs Paint + Primer.

(Source: HouseTweaking)

(Source: ScreamingMimi)

No, this room will not be a nursery, these were just the best photos that showcased dark walls with light and bright accents. This room will be our office for now, but some day down the road… like maybe two years, it could become a nursery. Everything that goes in that room will be light and bright. I have a yellow desk for there, and plan to re-do the dresser and book shelve in a light color as well… white or yellow. We’ve also got light gray curtains to add light and we plan to paint the woodwork all white as well.

So lesson for everyone living on this planet – when you paint stripes… keep them thin.

Master Bedroom Progress

It’s been a whole week plus two days since we’ve made this house our home. There are still so many boxes to unpack, but we’re slowly getting more and more settled in. We tried to do a little unpacking each night this week, but after a long day at work and making dinner, the last thing you want to do is unpack.

Saturday we made some more progress, however we encountered a small set back too. Our progress includes getting our bedroom almost complete, we hung the headboard, our shelves above the bed, and a mirror above my dresser (Thanks Drew!!).

But, we still have some work to do (here’s the areas below that need some TLC). We still have to hang up a few framed photos, and eventually redo the two nightstands, but it’s all live able right now. Oh, I want to get a tall-lean-against-the-wall-mirror for next to our closet and our shared, small closet needs some serious organization. PS – Our White Pintuck Duvet isn’t on our bed for these photos, my mom took it home to sew because it was a bit big.

And the setback… I’ll share another day this week. This time we’re focusing on the positive 🙂

SOURCE LIST
Curtains – World Market
Chandelier – World Market (my dad had to re-wire it for a ceiling light versus how it was made to just plug into the wall.
Shelves & Frames – Ikea
Sunburst Mirror – Target
Decorative Pillow – Target
Dressers – Goodwill that my Dad refinished
Nightstands – from a friend/sweet little ol lady who passed away (I’ll share that story soon)
Owl Ring Holder – gift from my friend Morgan

Moved In!

It’s official! We’re moved into our new house and have given over the keys to our old apartment and it feels great! However, it was a LONG weekend.

I took off three days from work just to get things done, along with my dad, mom, and sisters’ help**. Drew also rallied up his friends to help do the grueling move (special thanks to all those troopers). What also made the move successful is the truck that my work let us borrow – with that we were able to get everything we owned in one trip.

So here is a quick list of what we did prior to moving in – and I’ll share some photos of the current status of each main room. FYI, we have moved in, but still have tons of unpacking to do, so please look past the crazy amount of clutter and boxes and lack of stuff finished. This is progress people – to see what we plan to do in each room, see our Home To-Do List.

Wednesday: Closed at 9am and after headed over to the house to slap on paint samples. Ran to Home Depot with my mom to get the finalized colors. Painted the Kitchen, the Master Bedroom ceiling, and the laundry room.

Thursday: Painted the Master Bedroom walls, upstairs bathroom, hallway and the ceiling in the Family Room. We also cleaned a lot of the spaces as well as got our new washer and dryer installed – (thanks Barb)!

Friday: Moved a bunch of little oddball stuff that wouldn’t fit in the big moving truck easily – while my mom and dad finished up painting touch-ups, the family room (top part) and the chalkboard wall in the kitchen. We also moved over Eddy during the day. Then at night was the BIG move and our first official night sleeping at our new home.

Saturday: Cleaned the apartment like CRAZY because we had the walk-thru at 3:45pm. Then basically crashed on the couch and went out to Chilis for dinner to celebrate and because we were too tired to cook.

Sunday: Church in the AM, then did some more organizing in the afternoon, but didn’t feel like we made a dent to our massive pile. Drew also cut the grass with our new mower.

Overall a successful week/weekend and we’re soo happy to be here!

**A HUGE thanks to my parents for their crazy amount of help getting our home ready, we seriously couldn’t have done it without them and their expertise in painting, wiring, drywall patching, and more is priceless. I know I have woken up everyday this week since Wednesday feeling like I got runover by a truck, and I can only imagine they feel the same way. Love you guys!

Bathroom Makeover Ideas

Not sure if you notice a theme going on in our soon to be house… lots of grays and blues. I love how light blue paired with white and grays provide such a clean feeling (and I could totally use that right now with our disaster of an apartment). I’m also trying to stay much away from the warmer colors such as oranges and reds – I once had a red bedroom and I’m just not digging it anymore.

So anyways – A while back I shared a shower curtain that I purchased from Target. However, I have now returned it because I was having an incredibly hard time deciding on a wall color and accent colors. I saw this ikat print at Kohls and decided to scrap the whole idea and for a little over $100 I had everything bought (but the paint).

So here is our plan: Paint the walls a light gray color. Add the shower curtain, rugs, and hang the towels. I’d also like to stain the vanity a darker color. We’d also paint the door and trim white. This bathroom connects to our bedroom, so we’re glad this will work nicely with our bedroom. And then eventually down the road, replace the shower tile (and remove that extra step) and then replace the vinyl floor with tile as well. Also down the road: replace the countertop – as well as frame out the mirror. Last, but not least, replace the light fixture.

The countdown is on… 6 days until we close on our house!!

State of Crazy

State of Crazy would be the exact words I’d use to describe our apartment. The countdown is on… 10 days until we close! Right now we’re working on packing everything up as well as figuring out how to clean our apartment from top to bottom to get our security deposit back. Here are a few photos if you don’t believe me…

Picking the Perfect Grey Paint

I’m painting the walls grey. When people hear my say this, I think they are confused because being a graphic designer – and hints from my wardrobe (today I’m wearing cobalt blue pants and a leopard cardigan) they expect me to add crazy bold colors on the wall. While I’m totally for that, I also have an indecisive mind that likes to change things up a lot and often. Sticking with a neutral-y color on the walls allows me to add bold color with my accessories and allow for my taste to be swapped out easily without re-painting. And unless you want to volunteer to help us paint the incredibly tall vaulted ceilings over and over again – we’re sticking with a grey.

Now comes the challenge of finding the perfect grey. Grey can be made from any of the ROYGBIV colors, so greys can look different depending on what you put next to them and the lighting – thank you Color Theory 101. Story: Drew and I visited the fab homes at the Parade of Homes last weekend. One house we saw had lots of grey walls – however there was the one shade in the foyer that with the type of sunlight hitting it caused the walls to be purple/lavender. Eww.

Soo picking the perfect grey isn’t officially done – I have a few picked out that I plan to take to our new home first and view them in the lighting there. I also plan to paint test samples on the walls so that I can see how it looks in real-life. When I figure out my perfect grey, I will let you know the 411 – until then here are the colors I picked to try out.

And here are some grey colored rooms that I got my inspiration from…

Kelly Moore


Kelly Moore


Young House Love

 Knight Moves

 
Young House Love


House Tweaking

House Tweaking